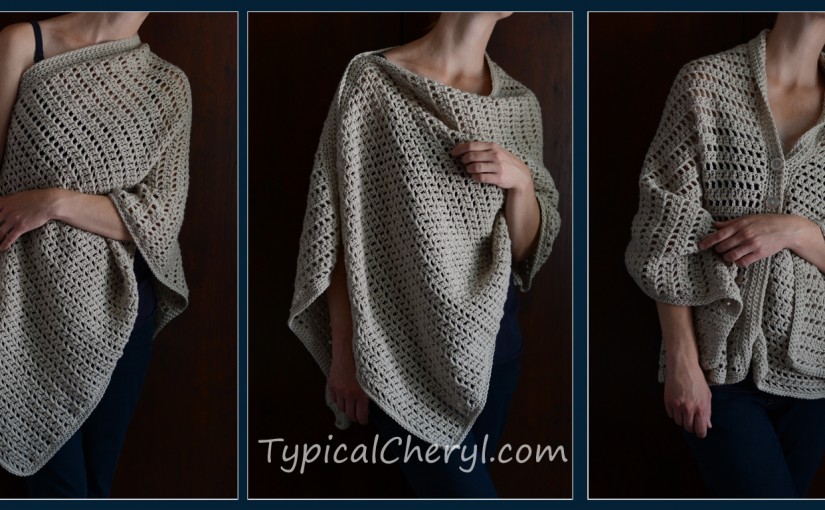
This is a versatile wrap that can be cozy and casual or a little sophisticated and stylish without being fussy or frilly. The open stitch pattern creates a monochromatic striped look and keeps it from being overly heavy or bulky. The light sport weight yarn used here (see previous post) is soft, a gre at neutral color (it seems to coordinate with any other color) as well as being machine washable and dryable. The finished wrap is lightweight and can be worn three different ways making it flexible enough to wear it for a casual autumn walk in the leaves, a springtime brunch, a summer night out or even an extra snuggly winter layer to stay warm at home or in the office.
The pattern is simple, so someone who is at a beginner level in crochet can do it. Also, after the chain and foundation row, it just repeats continuously to create a long rectangle so you can work on it whenever or wherever even if you don’t have access to the pattern. You will get into a groove and be amazed at how fast you will whip it up. It is easy to work on while watching TV or chatting with your crochet buddies. Add something special to your wardrobe or make a great gift for a friend or relative. Let’s get started!
Feel free to sell items you make with this pattern and please include a link to this page. I appreciate you spreading the word and sharing the love!
Materials
Sport weight yarn
US H/ 5 MM Crochet Hook
US J/ 6 MM Crochet Hook (to make the starting chain with a looser tension)
Coordinating thread for sewing on buttons
Buttons (I used two 7/8” buttons)
Special Stitch
2 DC Cluster stitch: Yarn Over (YO) insert hook in chain 1 space from previous row, YO and pull through two loops (2 loops remain on the hook), YO insert hook in the same chain 1 space YO and pull through two loops on the hook again (3 loops remain), YO and pull through all three remaining loops on the hook.
Chain 78 (I use a hook two sizes larger for my chain so the starting edge will not be tighter than the rest of the piece – for the chain here I used a US J/ 6 MM hook) The chain length will be the length of the wrap from the shoulder to the waist. The model here is 5’7”. Adjust the starting chain based on your desired length or the height of the person who will wear it. The starting chain needs to be a multiple of 2.
Row 1: Switch to US H/ 5 MM hook and DC in the third chain from the hook, chain 1 and skip one chain and DC in the next. Continue across the starting chain with a *DC, chain 1, skip one of the starting chains* and repeat until one chain remains. Place a DC in the last chain.
Row 2: Chain 3, turn and place a cluster stitch in the first chain 1 space then chain 1, *cluster stitch in the next chain 1 space, chain 1*. Repeat across and place one DC in the single DC from the previous row.
Row 3: Chain 2, turn and DC in the first chain 1 space, chain 1, *DC in the next chain 1 space from the previous row, chain 1*, repeat until the last chain 1 space. Place two DC in the last Ch 1 space.
Repeat Row 2 then Row 3 until you have reached your desired length. There are 111 rows in the wrap shown here.
Once you have reached your desired length, chain 1 and single crochet  (SC) in every stitch or chain on the short edge, place 2 SC in the corner. On the long edge place 2 SC at the end of every row (you will be working around a chain or a DC and it will alternate). Repeat until you have completed all four sides of the wrap.
Chain 1 and SC in every stitch.
When you finish this step you will have two rows of SC edging around the entire wrap. You could stop here, weave in your ends, and use it as a large scarf style wrap. If you continue and add buttons you’ll get the added versatility of different ways to wear this multipurpose accessory.
At this point you will complete the wrap by only working along one of the long edges and this will be the top collar edge of the wrap where you will place the buttons and button holes.

Before the next step you need to choose where to place the buttons and holes. Fold the wrap in half. I placed that folded edge on my shoulder and held the wrap together at a comfortable spot under my arm where it seemed like a good spot for the first button to be if I were wearing it on only one shoulder. For me this was about 5 inches below my underarm. The same spot where the bottom edge of my bra sits. When I wear the buttons on my shoulder this placement of the button holes adds a flattering drape to the collar edge. There is a V-shaped collar with buttons worn in front. Mark this meeting point in the two spots along the edge. Use stitch markers or bobby pins. One marker indicates where you want to sew on the button, the other is where you will make the button hole. For me this spot was 14 inches from the folded edge for the first button and 17 inches from the fold for the second one. My buttons are 7/8” and skipping two chains to create the button hole was a good size. If your buttons are smaller or larger you will have to adjust the size of the button hole you create. You could customize the wrap by using more or different size buttons.
Chain 1 SC in every stitch until you reach your stitch markers, *chain 2 and skip two stitches where you will be placing your button hole*, SC until you reach the second stitch marker and repeat between the asterisks(*). Finish the row by SC in every stitch.
Chain 1, turn, SC in every SC, place two SC in the chain spaces for each of the button holes.
Chain 1, turn, SC in each stitch along the top and continue around the entire piece. This will add a finished edge on the ends of the additional rows added to the top. Fasten off, weave in ends and sew on your buttons.
Enjoy your new wrap!
Special thanks to my good friend and crochet buddy, Andrea Tasevski of morganstreetdesigns.com, who tested the pattern for me. I am quite amazed by how fast she can whip these things up!
If you have any questions or need clarification please leave a comment below. I would love to see your finished project too.
Sign up for my email list here: